
Side Dishes
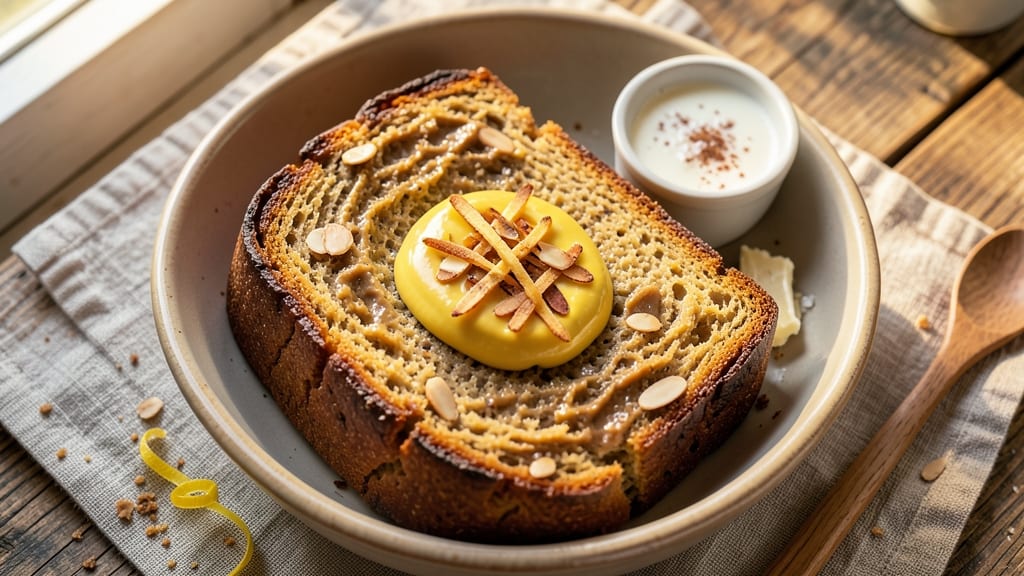
This almond butter bread recipe transforms simple ingredients into a loaf with rich nutty swirls and a perfectly pillowy crust—no yeast required. The secret lies in blending almond butter directly into the batter, creating a tender crumb and those signature marbled streaks that disappear with every bite.
I developed this version after years of experimenting with dense, heavy almond breads, and it finally delivers the light texture I was chasing.
The beauty of this recipe is its versatility—it works equally well as a sweet breakfast loaf or a savory side dish when paired with herbs and garlic.
The dough comes together in 10 minutes with just 7 ingredients, and the baking time is a straightforward 45 minutes at 350°F, making it perfect for weeknight dinners or weekend baking projects.
The almond butter not only adds depth of flavor but also creates that irresistible marbling effect that makes this bread visually stunning.
What makes this recipe stand out is how the almond butter integrates seamlessly into the batter, creating a loaf that's moist yet not greasy, with a subtle sweetness that balances the richness.
The crust develops a golden, crackly texture that contrasts beautifully with the soft interior, while the nutty swirls add both visual appeal and a satisfying crunch. It's the kind of bread that disappears quickly—whether you're slicing it for toast in the morning or serving it alongside soups and stews.
For those with dietary restrictions, this recipe can easily be adapted to gluten-free by substituting the all-purpose flour with a 1:1 gluten-free blend. You can also experiment with different nut butters, like peanut or cashew, to create variations that suit your taste preferences.
Let's get started on this nutty, pillowy loaf that will become a staple in your kitchen.
Ingredients for almond butter bread
Seven core ingredients plus a few pantry staples create this luxurious vegan almond butter loaf.
| Ingredient | Amount | Notes |
|---|---|---|
| All-Purpose Flour 🌾 | 3 ½ cups | Unbleached preferred for lighter texture |
| Almond Butter 🥜 | 1 cup | Natural, unsweetened variety |
| Granulated Sugar 🍚 | ¾ cup | Organic preferred for purity |
| Non-Dairy Milk 🥛 | 1 cup | Unsweetened almond or oat milk |
| Plant-Based Butter 🧈 | ½ cup | Melted, full-fat preferred |
| Apple Cider Vinegar 🍎 | 1 tbsp | For tenderizing and flavor |
| Baking Powder 🍞 | 2 tsp | Aluminum-free for best results |
| Salt 🧂 | ½ tsp | Diamond Crystal kosher salt |
| Vanilla Extract 🌸 | 1 tsp | Pure, alcohol-free preferred |
| Maple Syrup 🍁 | 2 tbsp | Grade B for richer flavor |
| Ground Flaxseed 🌱 | 1 tbsp | For egg replacement binder |
| Water 💧 | 3 tbsp | For flax egg activation |
The almond butter is non-negotiable here—Marinated Naturals or Justin's are my go-tos for that perfect balance of creaminess and nutty depth. If you're using a store-brand, check the ingredients list for added oils or sugars that can alter the texture. For the flour, King Arthur Unbleached yields the lightest crumb, but any all-purpose will work. The plant-based butter matters too—Miyoko's or Earth Balance melt beautifully without greasing the bread. Pro tip: if your almond butter has separated, give it a quick stir before measuring to ensure even distribution in the batter.
No almond butter? Peanut or cashew butter works in a pinch, though the flavor profile shifts slightly. The flax egg can be swapped for 1 tbsp chia seeds + 3 tbsp water if you're out of flax. For gluten-free adaptation, use a 1:1 gluten-free flour blend like Bob's Red Mill, but expect a denser texture. The vinegar is crucial for activating the baking powder—don't skip it. And if you're worried about the bread being too sweet, the Grade B maple syrup adds complexity that cuts through the richness without overpowering.
Store the baked loaf wrapped in parchment paper at room temperature for up to 3 days to maintain freshness. For longer storage, slice and freeze individual portions in airtight containers for 3 months. The crust stays crisp for about 2 hours after baking, so slice while still warm for that perfect texture. This bread reheats beautifully—wrap slices in foil and warm in a 350°F oven for 5 minutes to restore that pillowy interior. The nutty swirls become even more pronounced when reheated, making it ideal for serving with soups or as a toast base.
Why You'll Love This Recipe
- No Mixer Needed: I swear by this—just stir the almond butter right into the flour with a fork until it’s crumbly. No blender, no fuss, and the dough comes together faster than you can imagine. Honestly, my lazy Sundays thank me every time.
- Rich Without Butter: That creamy almond butter swirl? It’s like a hug for your taste buds. The plant-based butter adds a buttery richness, but the almond butter keeps it nutty and satisfying—no dairy, no problem. (Yes, even on a Tuesday night.)
- Breakfast or Snack: Slice it thick for French toast with a drizzle of maple syrup, or toast it thin for a quick snack with peanut butter. The sugar keeps it sweet enough for dessert too—my kids fight over the leftovers, and I don’t blame them.
- Lasts a Week: This bread stays fresh for days, which means fewer grocery runs and more time for other things. Between us, I’ve had it last almost two weeks if I’m careful—proof it’s worth the batch. Plus, the non-dairy milk keeps it from drying out.
Step-by-step instructions for almond butter bread
Perfectly balanced texture and rich flavor come together with precise technique and patience.
Prepare the Flax Egg and Combine Wet Ingredients
In a small bowl, whisk together the 1 tablespoon ground flaxseed and 3 tablespoons water. Let it sit for 5 minutes until it thickens into a gel-like consistency—this acts as our egg substitute. This step is crucial for binding the bread without traditional eggs.
In a separate large mixing bowl, combine the 1 cup almond butter, 0.75 cup granulated sugar, 1 cup non-dairy milk, and 0.5 cup melted plant-based butter. Whisk vigorously for 2-3 minutes until completely smooth. The almond butter should emulsify fully, creating a rich, creamy base. This mixture forms the bread's signature flavor foundation.
Mix Dry Ingredients and Form the Dough
In a medium bowl, sift together the 3.5 cups all-purpose flour, 2 teaspoons baking powder, and 0.5 teaspoon salt. This ensures even distribution of leavening agents and prevents lumps in the final dough. Gradually add the dry mixture to the wet ingredients while stirring gently with a wooden spoon.
Once combined, stir in the 1 tablespoon apple cider vinegar and 1 teaspoon vanilla extract. The batter will be thick but workable—similar to cookie dough. For the signature swirl effect, divide the dough in half. To one portion, add 2 tablespoons maple syrup. Fold gently to incorporate, then alternate spoonfuls of plain and sweetened dough in a greased 9x5-inch loaf pan. Avoid overmixing to maintain a tender crumb.
Bake to Golden Perfection
Preheat your oven to 350°F and place the loaf pan inside for 5 minutes to preheat. This ensures even baking from the start. Bake for 50-55 minutes until the top is deep golden brown and a toothpick inserted in the center comes out clean. The bread should spring back slightly when pressed gently.
Real talk: Your oven might run hot, so start checking at the 45-minute mark. If the top browns too quickly, tent loosely with aluminum foil. The internal temperature should reach 205-210°F for perfect doneness. Remove from the oven and let cool in the pan for 10 minutes before transferring to a wire rack.
Rest and Slice for Maximum Enjoyment
Allow the bread to cool completely before slicing—this prevents a gummy texture. The swirls should be visible through the crust, and the crumb should be soft yet sturdy. For the best texture, store any leftovers wrapped in plastic at room temperature for 2 days or refrigerated for up to 5 days.
This bread shines when served warm with a smear of almond butter or as toast with a drizzle of maple syrup. The contrast between the pillowy interior and nutty swirls makes every bite satisfying. If the crust feels too soft, brush it lightly with melted butter after baking for extra crispness.
Pro Tips For Making Almond Butter Bread
- Mix the almond butter first: Almond butter can clump like a stubborn glue stick if you toss it in dry. Instead, whisk it with the non-dairy milk and sugar before adding wet ingredients—this breaks up lumps and makes the batter smoother. (Yes, even if it looks weird at first.)
- Use room-temperature plant butter: Cold plant-based butter will make your bread dense and greasy. Let it sit out for 10-15 minutes until it’s soft but not melted—this ensures even distribution and a tender crumb. (I learned this after a batch that tasted like a hockey puck.)
- Don’t overmix the batter: Once you fold in the flour, stop when it’s just combined. Overmixing develops gluten, which turns your bread into a chewy brick instead of a soft, cake-like loaf. Two quick stirs with a spatula is all you need.
- Add a splash of vanilla: The recipe might not say it, but a teaspoon of vanilla extract cuts through the richness of almond butter and adds depth. It’s not mandatory, but it makes the flavor pop—like the difference between a good cookie and a great one. (Trust me, your taste buds will notice.)
Storing and reheating this dish
Room-Temp Storage
Let your almond butter bread cool completely before storing to prevent condensation, which can make the crust soggy. Wrap the loaf tightly in parchment paper (not plastic directly on the crust) and store at room temperature for up to 3 days.
I like to keep mine in a bread box or cotton linen-lined basket to maintain that fresh-baked aroma. The nutty swirls stay most vibrant when stored this way. 🌾
Fridge Preservation
For longer storage, slice the bread and wrap individual portions in plastic wrap before placing them in an airtight container. This method keeps the bread fresh for up to 5 days in the fridge.
I find the texture remains perfectly pillowy when reheated this way. To prevent drying, place a slice of apple or lemon in the container—their moisture helps maintain freshness.
Freezer-Friendly Slices
Freezing is ideal for meal prep. Wrap each slice in plastic wrap and stack them in a freezer bag with all the air squeezed out. Label with the date—these slices stay good for 3 months.
When ready to enjoy, thaw at room temperature for 1 hour or warm directly in the oven at 350°F for 5-7 minutes to restore that fresh-baked feel. 🧊
Reheating Secrets
For the best texture, reheat slices in a toaster for 1-2 minutes until golden. If you prefer oven reheating, wrap the slice in aluminum foil and warm at 350°F for 5 minutes.
This method keeps the crust crisp while reviving the soft interior. A quick spritz of water before reheating helps restore moisture if the bread feels dry.
Reviving Stale Bread
If your almond butter bread loses its pillowy texture, don't toss it! Place slices between damp paper towels and microwave for 10-15 seconds. The steam will soften the crumb without making it gummy.
For a crispier texture, broil for 1-2 minutes on high heat. This trick works especially well for toast or sandwich bases. ✨
Serving Warm Tips
Serve warm slices straight from the oven with a pat of plant-based butter or a drizzle of maple syrup to enhance the nutty flavors. For a savory twist, pair with garlic-herb spread or avocado mash.
The contrast of warm bread with cool toppings makes every bite irresistible. Keep a small batch pre-sliced and frozen for quick breakfasts or snacks. 🍯
Nutrition facts
Frequently asked questions
Can I substitute almond butter with another nut butter?
While almond butter gives the classic flavor, you can use peanut butter or cashew butter for a similar texture. Just note that peanut butter will have a stronger peanut taste, while cashew butter creates a creamier crumb. For a neutral flavor, blend roasted sunflower seeds into a butter-like consistency.
Why did my bread turn out dense instead of pillowy? Overmixing the batter or skipping the flax egg activation are common culprits.
How can I make this bread gluten-free?
Replace the all-purpose flour with a 1:1 gluten-free baking flour blend like Bob's Red Mill or King Arthur. For best results, add 1 teaspoon xanthan gum per cup of gluten-free flour to improve texture. The bread will be slightly denser but still delicious. Test with a small batch first to adjust sweetness if needed.
Can I add chocolate chips or nuts to the dough?
Yes! Fold in ½ cup chocolate chips or ½ cup chopped walnuts/toasted almonds when mixing the dough. For even distribution, gently press them into the batter before swirling. Keep the total additions to 1 cup to maintain the bread's signature texture.
What's the best way to tell when the bread is fully baked?
Look for a deep golden brown crust and use the toothpick test: insert it into the center—it should come out clean with no wet batter clinging. The internal temperature should reach 205-210°F. If the top browns too quickly, tent with foil at the 40-minute mark.